Heading out the door? Read this article on the new Outside+ app available now on iOS devices for members! Download the app.
Being able to properly tie climbing knots is an essential skill every climber regardless of experience or ability must not only learn but master. There are hundreds of types of knots you can use for climbing—entire books have been written on knots—so taking the step to learn them can be daunting. Still, don’t tie yourself in knots with worry. When I started climbing in 1973 climbers used four basic knots, the Double Bowline, Ring Bend, Prusik, and Clove Hitch, and those got me by for over a decade. Of course, since those early climbing days, climbing and climbing knots, have evolved to better meet climbing’s demands.
Entire books have been written on knots. My favorite, The Ashley Book of Knots has nearly 4,000 knots, but you can get started with just seven the basics: the Trace Eight aka Trace Figure-Eight Knot, Ring Bend, Prusik, Figure-Eight On a Bight, Munter Hitch, Double Fisherman’s, and Girth Hitch—I’ve never been in a situation where I needed to know more than these seven, although I do know quite a few more “just in case.” Gym/Indoor climbers will hearten to know that they really just need to learn one knot, the Trace Eight, the knot most climbing gyms require you to use for tying the rope to your harness.
Even my seven recommended knots might be too many to get you started—you might never use the Munter Hitch or Prusik (neither is a knot by technical definition, but I digress), which come play more for traditional climbing than sport climbing. Even so, when you climb you can and probably will find yourself in situations, predicaments even, where these knowing these knots will save the day. It’s a good idea to learn them.
I learned to climb on my own by trial and error, studying magazine photos and reading what few how-to books existed back in the day. You can and should do better than me. This article is just an introduction to knots. Read it, then partner with a mentor or get professional instruction from a certified guide, or enroll in a climbing class at your school. There is no substitute for hands-on experience taught by an expert.
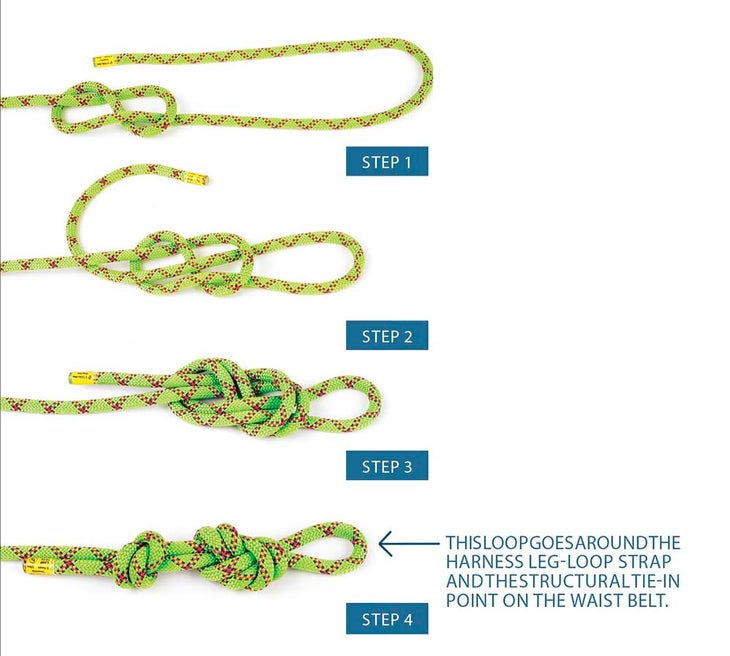
The Trace-Eight (or Trace Figure-Eight Knot)
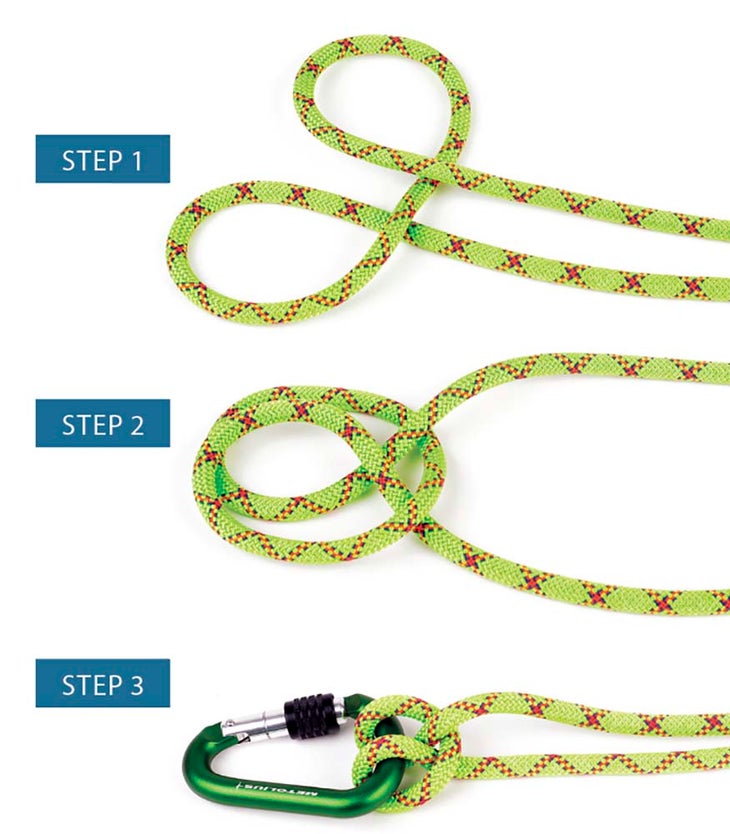
Your tie-in knot, the one that connects you to the end of the rope, is the knot to learn first, and is the only knot you’ll use every time you rope up. Climbers use various knots to tie in, but the Trace-Eight is the easiest to learn and the least likely to untie itself. Unfortunately, it cinches up tight after a hard fall, making it difficult to untie. Consider this a small price to pay for security. Practice this knot until you can tie it, rain or shine, in the dark.
The Trace-Eight is easy to tie. Simply tie a figure eight knot in the standing portion of the rope about 24 to 30 inches from the end, then reverse weave the end of the rope backwards through the knot as shown, being certain to leave a 12- inch tail. Secure the tail with half of a Double Fisherman’s knot, or an overhand. Tighten!
To Climb in a gym you just need to know one knot, the Trace-Eight. You’ll use this knot to tie in to the rope, both for leading and toproping. In fact, many gyms require that you tie in with the Trace-Eight, and they will make you take a test to guarantee that you can tie it correctly.
USE
- Connect rope to harness.
ADVANTAGE
- Easy to tie and remember.
- Easy to visually inspect—just looks wrong when you don’t tie it correctly.
ALSO READ: 10 THINGS I DOUBT YOU KNOW ABOUT KNOTS
FOCUS!
Pay attention every time you tie in. Serious accidents happen each year because someone becomes distracted while tying in and either ties this critical knot wrong or never completes it. Concentrate as if your life depends on it (it does), and make certain you thread the rope through both the leg-loop strap and the waist belt on your harness, as prescribed by the manufacturer
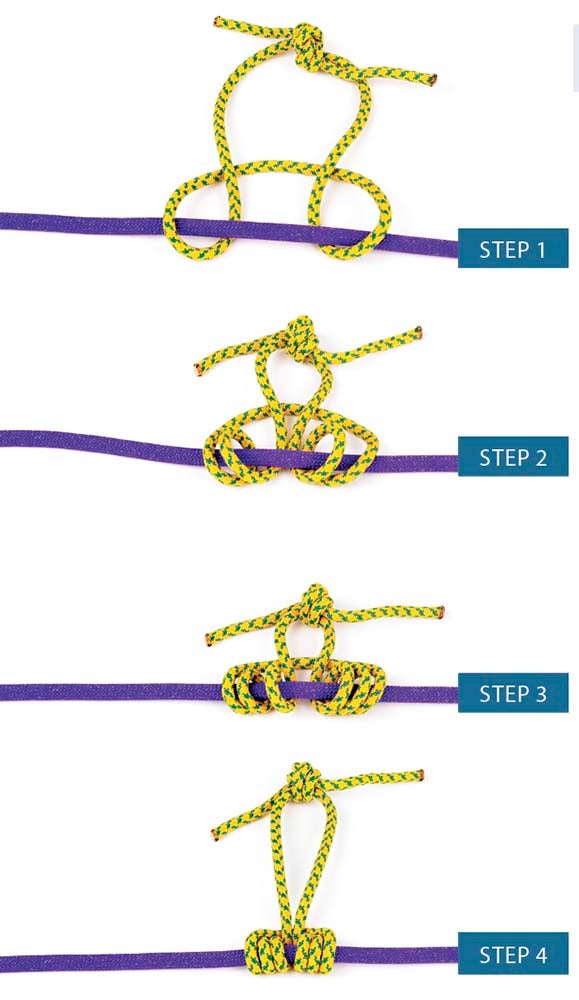
Ring Bend (Water Knot)

Use the ring bend to tie webbing to webbing, and to tie cord to cord and rope to rope. The ring bend is secure and easy to get right because it is simply an overhand knot traced through itself. It is possible for the ring bend, like all knots, to loosen and untie itself—inspect it before every climb, and always tie it leaving at least two inches of tail—and more is better—on each side. The main use for the ring bend is to tie loops of nylon into slings, or “runners,” although anymore slings and runners are sewn. Sewn slings and runners are more compact, lighter, rack more easily, but since you can’t untie a sewn sling they can’t be tied around chockstones or trees, such as you may need to do from time to time to descend multi-pitch and alpine routes.
Some climbers prefer the ring bend for tying rappel ropes together. The double fisherman’s, however, serves the same purpose and is easier to untie after the ropes have held weight. In particular, knots in wet ropes can be difficult to untie, since they stretch more than dry ropes.
USES
- Tie slings and cord into loops
- Tie rappel ropes together
ADVANTAGE
- Simple and easy to remember.
RECOMMENDED BOOK ON KNOTS
Climbing attracts knot aficionados who can study the craft well beyond what climbers need. But it might not be all amusement: The odd or infrequently tied knot can be useful and might even save the day. The Ashley Book of Knots, by Clifford W. Ashley, is the encyclopedia of knots, with over 3,800 knots and 7,000 illustrations, all drawn by Ashley.
Prusik
The prusik is a useful friction hitch that slides freely when not weighted, but bites down on the rope when you do weight it. Many variations on the prusik exist, including the autoblock and klemheist, but for simplicity we’ll stick with the prusik. You can learn the other hitches down the road. The most common use for the prusik is to back up your rappel device by tying a prusik on the rope below the device, or above it depending on your preference. I prefer it below the rappel device so I can push it down with my brake hand as I rappel.
Two prusiks placed on a rope and clipped to your harness with long runners let you climb the rope by alternately weighting and unweighting the prusiks, inchworm style. This technique is a lifesaver when you fall on an overhanging route and are stranded in space, unable to get onto the rock. Even one prusik on a rope is a good handhold, letting you boost yourself past an impossible move.
To tie a prusik, use 4 to 6mm perlon cord tied into a 12-inch loop with a ring bend. (You can buy sewn prusik loops.) Thinner cord grips better than thick cord, and shoelaces will work in an emergency. Wrap the loop three or more times around the rope until it bites well enough not to slip. Webbing works in an emergency, but requires more wraps to grip, and is more difficult to loosen and slide.
USES
- Ascend a rope, aka “prussiking.”
- Good for crevasse extraction and other emergencies.
ADVANTAGES
- Simple and easy to remember.
- Has many variations to suit various uses.
- Can be tied in nearly any cord in an emergency.
WATCH VIDEO ABOUT FRICTION HITCHES
Figure-Eight on a Bight
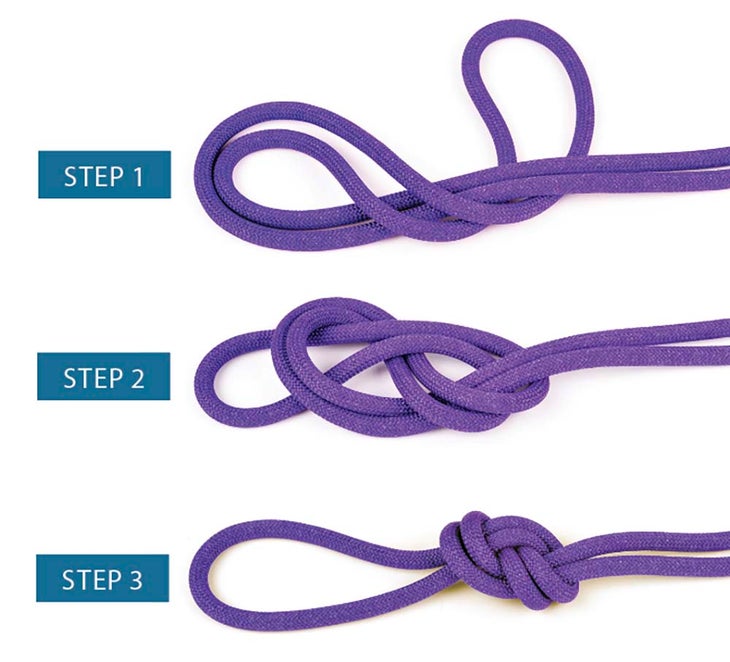
The figure-eight on a bight is a good knot for quickly tying a loop to clip the rope to an anchor, and to anchor yourself to a belay station. A typical belay utilizes the figure-eight on a bight, but also can include a clove hitch, which is easily adjustable and easy to untie after it has held a load.
USES
- Anchor your self to the belay.
- Tie off the rope to anything, as long as you have a locking carabiner to connect it.
ADVANTAGES
- Simple and easy to remember.
- Easy to untie after it has held a load.
Munter Hitch
Drop your belay/rappel device and you will be glad you know how to tie a Munter Hitch.
This hitch works for belaying and rappelling: pull back on one side, and the Munter Hitch cinches onto itself, creating enough friction to hold a fall or control a rappel. Tie the Munter Hitch on a large locking carabiner to allow the knot to swivel, as it must when you are paying out and reeling in slack.
Despite the Munter Hitch’s utility, only use it in a pinch. The hitch twists the rope into snarls.
USE
- Works as an emergency belay or single-rope rappel “device”
ADVANTAGE
- Works on any size rope.
READ MORE ON KNOTS, RAPPELLING AND USING SLINGS
Double Fisherman’s Bend

Joining two ropes of the same or different diameter is a job for the double fisherman’s, which, due to its many twists and turns, is less likely to untie itself than the ring bend. Other uses for the proven double fisherman’s include tying off cord threaded through a nut, and as a variation, the single fisherman’s, to secure the tail of your tie-in knot, the Trace-Eight. Some climbers use the double fisherman’s instead of the ring bend to tie webbing runners.
Though the double fisherman’s works well, it welds itself into a near impossible-to-untie lump after it has held a fall, although less so than the Ring Bend. Since you sometimes need to untie your slings to thread them around objects, such as trees, you can tap and roll a tightened double fisherman’s against the rock to soften it, then use your nut tool (or teeth) to pry it apart.
USES
- Tie slings and cord into loops
- Tie rappel ropes together
ADVANTAGES
- Bomber—unlikely to come untied.
- Easy to untie after it has held weight, even in wet ropes.
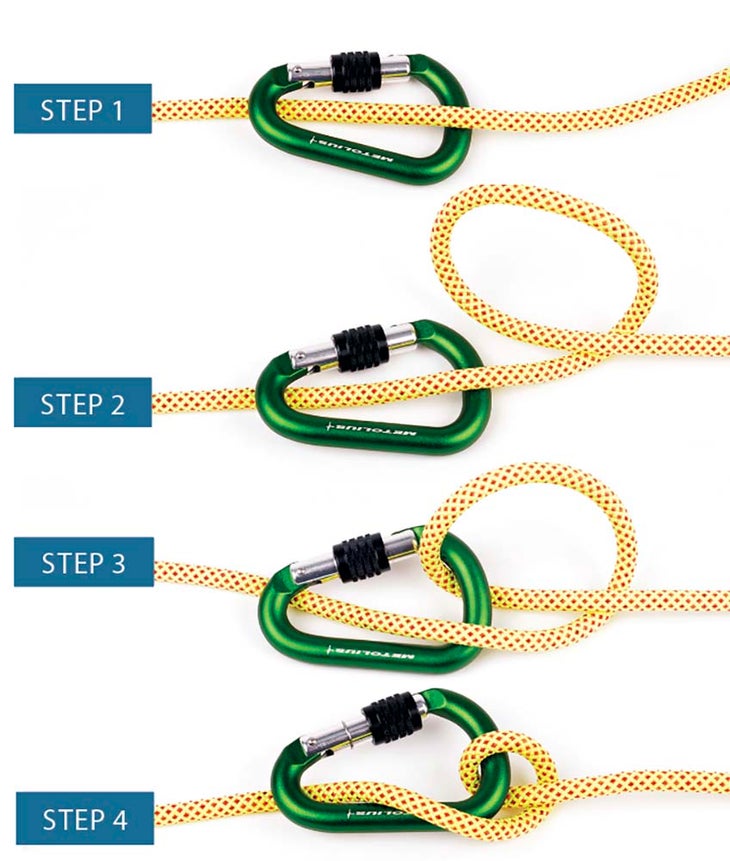
Girth Hitch
The girth hitch has innumerable applications, including cinching a runner on a knob or around a tree, attaching a sling to your harness belay/rappel loop, and hitching several runners together into a chain to make a longer sling. The girth hitch also works well to cinch a short sling around the shaft of a fixed pin or bolt that sticks out too far, reducing leverage.
USES
- Hitch clings together to lengthen them when you don’t have a carabiner.
- Tie off fixed pitons that aren’t drive all the way in.
- Versatile—you’ll find many other uses for it.
ADVANTAGE
- Simple and easy to remember.
Clove Hitch
The clove hitch is popular for attaching yourself to a belay or rappel station. Quick to tie and adjustable, the clove hitch is more versatile and user-friendly than the figure-eight on a bight. If you tie yourself too close to the anchor, simply loosen the clove hitch and let slack slide through. Re-tighten. Reverse the process to position yourself closer to the station.
A cinched-up clove hitch can be difficult to loosen, unless you know the secret. Wiggle the carabiner out, and the knot falls apart.
The caveat is that you must never use the clove hitch to anchor the end of a rope—if the clove hitch slips, the tail could pull through the knot,
untying it. Use the more secure figure-eight loop to anchor the end of a rope.
USES
- Attach yourself to an anchor.
- Tie off anything that you need to be able to adjust in length.
ADVANTAGE
- Versatile—you’ll find many additional uses.
HOW TO TIE KNOTS WITH ONE HAND
The crucial equation in alpine climbing—efficiency equals speed, which equals safety—means that every second saved at a belay transition is another second spent getting to the top. One simple (and pretty suave) time saver is tying two often-used hitches—the Munter and the clove—with one hand. You might be at a sketchy stance with one hand on the rock for balance while you build the anchor and clove yourself in, or you might be simul-climbing and suddenly need to put your partner on belay quickly with a Munter. Whatever the scenario, learning to tie both hitches one-handed will help improve your overall efficiency on long routes (and impress your friends to boot). Plus, they’re easy to learn and will quickly become muscle memory.
How to Tie a One-Handed Clove Hitch
This hitch is used most often as a way to connect yourself to the anchor. Not only is the clove hitch easy to tie (one- or two-handed), but the beauty of it is that you can adjust the length of the rope on either side of the hitch without untying it.

1. Clip into the carabiner like you would when leading, with your side of the rope on top—coming up through the biner and away from the wall.

2. Reach across your rope and grab the bottom strand. Pull it up slightly and create a small loop, with the bottom part of the rope on top.

3. Bring the loop across your rope and, with palm facing gate, clip on the biner.

4. Pull on each strand to tighten it up, and you’ve got a clove hitch.
- Want to learn to trad climb? Internationally certified mountain guides Rob Coppolillo and Marc Chauvin will teach you the fundamentals of trad climbing in our 8-week online course: Intro to Trad Climbing. From placing/removing gear and proper belay techniques, to how to make an anchor and manage a stuck rope, Intro to Trad Climbing takes the guesswork out of exploring traditionally protected climbs.
How to Tie a One-Handed Munter Hitch
Every climber should be able to quickly tie a Munter; you can use it to belay or rappel if you drop your belay device. Plus, it’s good for de-icing the rope in frozen conditions. However, it will kink your rope much more than a standard belay device.

1. Start the same way as the clove hitch, with your rope coming up through the biner and away from the wall.

2. Grab the strand behind the biner with your hand palm up and flick your wrist toward the biner to create a loop (bottom section of rope on top).

3. Turn that loop so your knuckles are facing the biner and clip it on.

4. Pull on each strand to tighten; the Munter should flip through the biner.